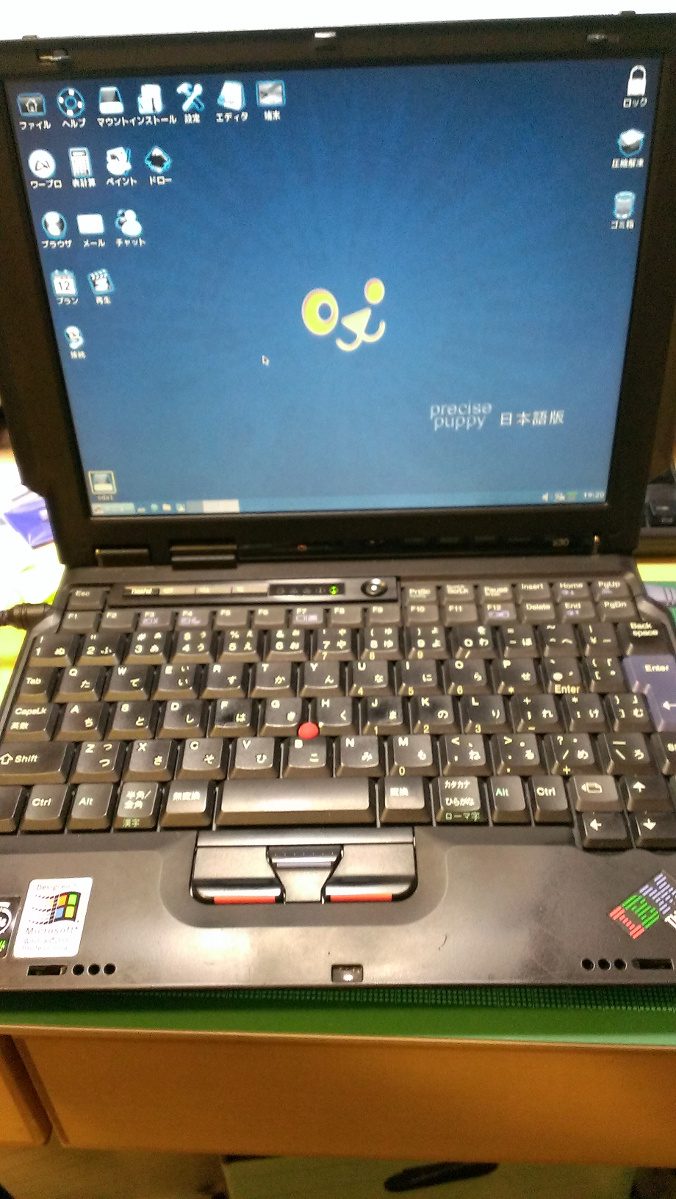
ThinkPad s30にPuppyLinux 5.5をインストールしてみました。 [ソフトウェア]
Puppy Linux 日本語サイト
部屋を片付けていたら出てきたThinkPad s30。キーボードのピッチを犠牲にしないように耳の付いたデザインに魅かれ購入。性能もバッテリーの持ちもよく、Windows2000で使っていました。出張のお供として重宝していましたね。その後、WindowsXPの時代になり、Dynabookに乗り換えました。
今となっては、PentiumIII、RAM128MBと、どうしようもないスペックですが、Linuxなら入るんじゃないかと、調べてみると、流行のUbuntuも、日本語環境で定評のあるVineも要求スペックが高い。
そこでもうちょっと探してみると、PuppyLinuxは、RAM256MBでも動作することがわかり、試してみることにしました。s30は最大で256MBのRAMを認識するので、Transcend IBM 20L0255準拠 128MB FOR THINKPAD 390X/600X DIMM TS128MIB0255 を購入して増設しました。PuppyLinuxのサイトから、Puppy5.5のisoファイルをダウンロード。CD-ROMからブートしてみると、Xが立ち上がらず、起動に失敗。xorgwizardで設定を試みるもこれも失敗。しかし、Puppy4.3.1は、Xが自動で立ち上がりました。
おそらくxorg.confを適切に書き換えればよいだろうということで、調べたうえ、下記のようにxorg.confを書き換え、Xの起動に成功しました。ついでに、トラックポイントの真中のクリックボタンを有効にすることもできました。
-----------ここから----------------
--------------ここまで-----------------
以上も含め、下記の順番でPuppyLinux 5.5をHDDにインストールしました。
1.5.5で、xorgwizardを実行してから、viで、xorg.conf (/etc/X11 にある)を編集。
2.xwin でX起動。。。成功!
3.初期設定
4-0.パーティションの設定(GParted)
4.インストール
4-1.ユニバーサルインストール
4-2.内蔵HDDを選択
4-3.FULLインストールを選択
4-4.旧バージョンのパピーを消去
4-5.インストール開始
4-6.「メニュー」-「セットアップ」-「Grub4Dos ブートローダの設定」を実行して再起動
4-7.個人設定を保存しなかったらもう一回1.を繰り返す。
無事にインストールを完了しました。
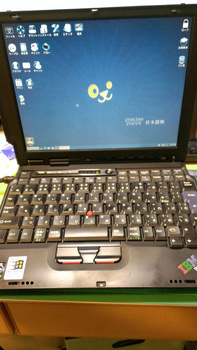
使った感想は、動作がもっさり。Puppy 4.3.1にダウングレードしてもうちょっと快適に使おうかなと思案中です。
部屋を片付けていたら出てきたThinkPad s30。キーボードのピッチを犠牲にしないように耳の付いたデザインに魅かれ購入。性能もバッテリーの持ちもよく、Windows2000で使っていました。出張のお供として重宝していましたね。その後、WindowsXPの時代になり、Dynabookに乗り換えました。
今となっては、PentiumIII、RAM128MBと、どうしようもないスペックですが、Linuxなら入るんじゃないかと、調べてみると、流行のUbuntuも、日本語環境で定評のあるVineも要求スペックが高い。
そこでもうちょっと探してみると、PuppyLinuxは、RAM256MBでも動作することがわかり、試してみることにしました。s30は最大で256MBのRAMを認識するので、Transcend IBM 20L0255準拠 128MB FOR THINKPAD 390X/600X DIMM TS128MIB0255
おそらくxorg.confを適切に書き換えればよいだろうということで、調べたうえ、下記のようにxorg.confを書き換え、Xの起動に成功しました。ついでに、トラックポイントの真中のクリックボタンを有効にすることもできました。
-----------ここから----------------
#Special base config file used in Puppy Linux.

# **********************************************************************
# Module section -- this  section  is used to specify
# which dynamically loadable modules to load.
# **********************************************************************
#
Section "Module"

# This loads the DBE extension module.

    Load        "dbe"      # Double buffer extension

# This loads the miscellaneous extensions module, and disables
# initialisation of the XFree86-DGA extension within that module.
    SubSection  "extmod"
      Option    "omit xfree86-dga"   # don't initialise the DGA extension
    EndSubSection

# This loads the font modules
#    Load        "type1"
#    Load        "freetype"

# This loads xtrap extension, used by xrandr
#    Load       "xtrap"

# This loads the GLX module (if present). xorg 7.4/5 need explicit disable to disable...
#    Disable    "glx" #LOADGLX

# This loads dri module (if present). 7.4 loads it by default, have to disable...
#    Load       "dri" #LOADDRI
#    Disable "dri"

EndSection

# **********************************************************************
# Files section.  This allows default font paths to be set
# **********************************************************************

Section "Files"

# Multiple FontPath entries are allowed (which are concatenated together),
# as well as specifying multiple comma-separated entries in one FontPath
# command (or a combination of both methods)

    FontPath   "/usr/share/X11/fonts/misc/"
    FontPath   "/usr/share/X11/fonts/Type1/"
    FontPath   "/usr/share/X11/fonts/TTF/"

EndSection

# **********************************************************************
# Server flags section.
# **********************************************************************

Section "ServerFlags"

# Uncomment this to disable the <Crtl><Alt><Fn> VT switch sequence
# (where n is 1 through 12).  This allows clients to receive these key
# events.

#    Option "DontVTSwitch"

# Enables mode switching with xrandr
# There is a report that this can cause Xorg not to work on some
# video hardware, so default is commented-out...
# but i want to use it in xorgwizard so leave on...

    Option "RandR" "on"

# With this, Xorg won't talk to HAL to add evdev devices and you'll be back
# with the old Xorg behavior (pre-7.4)...

    Option "AutoAddDevices" "false"

# For no-Hal, kirk also suggests this...

#    Option "AllowMouseOpenFail" "true"

# Xorg 7.4, Ubuntu Jaunty, CTRL-ALT-BACKSPACE is disabled by default...

    Option "DontZap" "false"

EndSection

#everything past here is auto-generated by Puppy's Xorg Wizard...


Section "ServerLayout"
    Identifier     "X.org Configured"
    Screen      0  "Screen0" 0 0
    #Screen      1  "Screen1" RightOf "Screen0"
    InputDevice    "Mouse0" "CorePointer"
    InputDevice    "Keyboard0" "CoreKeyboard"
EndSection

Section "InputDevice"
    Identifier  "Keyboard0"
    Driver      "kbd"
    Option      "XkbRules" "xorg"
    Option      "XkbModel" "jp106"
    Option      "XkbLayout" "jp" #xkeymap0
EndSection

Section "InputDevice"
    Identifier  "Mouse0"
    Driver      "mouse"
    Option        "Protocol" "IMPS/2" #mouse0protocolfile:///usr/share/doc/home.htm
    Option        "Device" "/dev/mouse"
    Option      "Emulate3Buttons" "on"
    Option        "EmulateWheel" "true"
    Option        "EmulateWheelButton" "2"
    Option        "EmulateIntrtia" "50"
    #Option      "Emulate3Timeout" "50"
    Option      "ZAxisMapping" "4 5" #scrollwheel
EndSection

Section "Monitor"
    Identifier   "Monitor0"
    VendorName   "Monitor Vendor"
    ModelName    "Monitor Model"
    HorizSync    31.5-48.5
    Vertrefresh  56.0-65.0
    #UseModes     "Modes0" #monitor0usemodes
    Option      "PreferredMode" "1024x768"
    EndSection

Section "Modes"
    Identifier "Modes0"
    #modes0modeline0
EndSection

Section "Monitor"
    Identifier   "Monitor1"
    VendorName   "Monitor Vendor"
    ModelName    "Monitor Model"
EndSection

Section "Device"
    ### Available Driver options are:-
    ### Values: <i>: integer, <f>: float, <bool>: "True"/"False",
    ### <string>: "String", <freq>: "<f> Hz/kHz/MHz",
    ### <percent>: "<f>%"
    ### [arg]: arg optional
    #Option     "ShadowFB"               # [<bool>]
    #Option     "Rotate"                 # <str>
    #Option     "fbdev"                  # <str>
    #Option     "debug"                  # [<bool>]
    Identifier  "Card0"
    Driver      "siliconmotion" #card0driver
    BusID       "PCI:0:9:0"
    Option      "UseBIOS" "No"
EndSection

Section "Device"
    ### Available Driver options are:-
    ### Values: <i>: integer, <f>: float, <bool>: "True"/"False",
    ### <string>: "String", <freq>: "<f> Hz/kHz/MHz",
    ### <percent>: "<f>%"
    ### [arg]: arg optional
    #Option     "ShadowFB"               # [<bool>]
    #Option     "DefaultRefresh"         # [<bool>]
    #Option     "ModeSetClearScreen"     # [<bool>]
    Identifier  "Card1"
    Driver      "vesa"
    BusID       "PCI:0:9:0"
EndSection

Section "Screen"
    Identifier "Screen0"
    Device     "Card0"
    Monitor    "Monitor0"
    DefaultDepth 16
    #Option         "metamodes" "1024x768_60 +0+0" #METAMODES_0
    Subsection "Display"
        Depth       16
        Modes       "1024x768"
    EndSubsection
EndSection

Section "Screen"
    Identifier "Screen1"
    Device     "Card1"
    Monitor    "Monitor1"
    DefaultDepth 16
    #Option         "metamodes" "1024x768_60 +0+0" #METAMODES_1
    Subsection "Display"
        Depth       16
        Modes       "1024x768"
    EndSubsection
EndSection

#PuppyHardwareProfile=Silicon_Motion_SM720
--------------ここまで-----------------
以上も含め、下記の順番でPuppyLinux 5.5をHDDにインストールしました。
1.5.5で、xorgwizardを実行してから、viで、xorg.conf (/etc/X11 にある)を編集。
2.xwin でX起動。。。成功!
3.初期設定
4-0.パーティションの設定(GParted)
4.インストール
4-1.ユニバーサルインストール
4-2.内蔵HDDを選択
4-3.FULLインストールを選択
4-4.旧バージョンのパピーを消去
4-5.インストール開始
4-6.「メニュー」-「セットアップ」-「Grub4Dos ブートローダの設定」を実行して再起動
4-7.個人設定を保存しなかったらもう一回1.を繰り返す。
無事にインストールを完了しました。
使った感想は、動作がもっさり。Puppy 4.3.1にダウングレードしてもうちょっと快適に使おうかなと思案中です。
Facebook コメント
karintokoba さん

-
nice! 197
記事 366
テーマ パソコン・インターネット
プロフィール
ブログを紹介する


コメント 0